Monday, October 9, 2017

How Making Windows Media Player Play Video_TS files Fine ?

This article showcases best way to play Video_TS files on Windows Media Player.

Source From: Play Video_TS files on Windows Media Player

Microsoft’s popular Windows Media Player ( often shortened to WMP), is a software program that has quite a lot going for it when it comes to organizing digital media.

As well as being a full-featured jukebox in its own right, it can also be used for:

Transferring (ripping) audio CDs to a digital audio format.
Listening to thousands of Internet radio stations.
Burning custom-made CDs.
Organizing media files (including movies and images).

and many other tasks.

As we know, Windows Media Player doesn’t support the DVD Video_TS format. According to Microsoft, Windows Media Player supported file formats include WMV, AVI, ASF, WMA, etc. Among them, the relatively common used formats are WMV, WMA and AVI. So many people find that Windows Media Player won’t play Video_TS at all.

Since Video_TS are actually DVD videos, to convert DVD Video_TS folder to WMV or AVI, you need to get a DVD file converter.

You can try Brorsoft DVD Ripper.

Overall, this DVD ripping program enables you to rip and convert DVD disc, DVD VIDEO_TS folder, DVD ISO/IFO files to all popular video formats .wmv, .avi, .mp4, .mpg, etc and even extract audio from DVD movies. Besides, the built-in video editor allows you to trim, crop, add watermarks, etc. to get the very part and effect you want. Just get the right version and follow the guide below to convert VIDEO_TS to a video/audio format you need.

(Note: Click here for OS X 10.5)

Tutorial: Converting Video_TS to Windows Media Player format

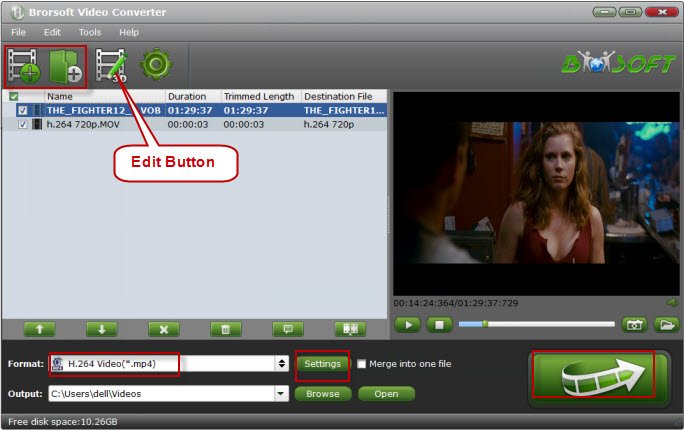
1. Click "Load DVD" to select and add the Video_TS folder to the VIDEO_TS Converter Mac. You can also simply drag and drop the Video_TS folder to the source pane. If there are many tiles in the Video_TS folder, you can choose some titles to rip as you need.


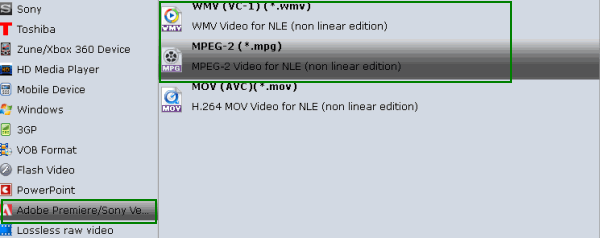
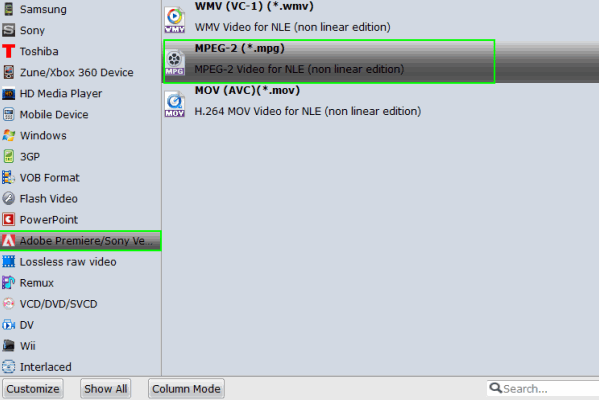
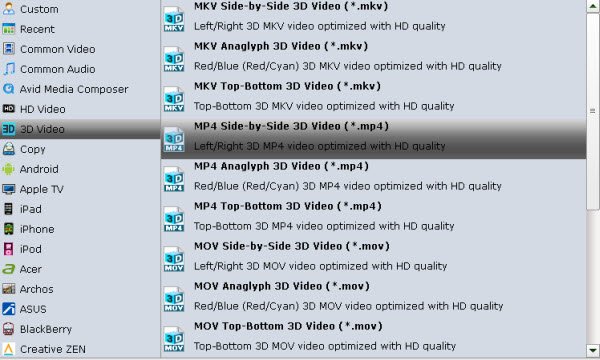
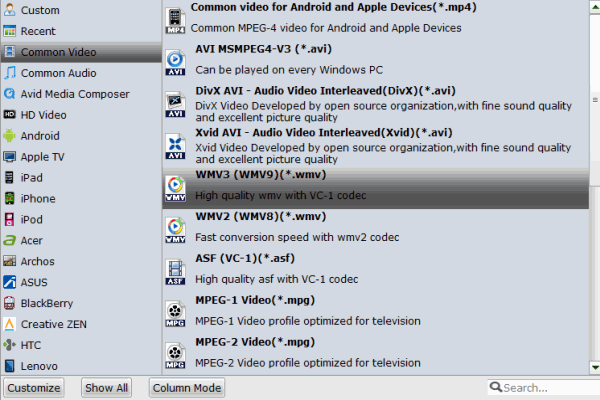
2. Click the Format menu, select Windows Media Player friendly format as your output video format. There, you can take WMV as your output video format.


3. Edit your VIDEO_TS files(Optional)

You can click Edit to trim, crop the DVD movies so as to get the part you want or add some special effect on your movie.


4. Finally click the Convert button to begin ripping Video_TS to Windows Media Player format.

After encoding process has finished successfully, go into the destination directory and drop the converted files into Windows Media Player. Once all this is done, your videos will be ready to play with Media Player on Windows. Just enjoy.

More Guides:

Play DVD on Windows 10
VOB in Windows Media Player
Tivo in Windows Media Player
MOV in Windows Media Player
Blu-ray in Windows Media Player
DVD in Windows Media Player
DVD to Windows Media Video
Rip Blu-ray to WMV Format

Thursday, May 12, 2016

Add and Import FLV to Sony Movie Studio 13/12/11/10 for Editing

Now keep reading a brief how-to on the simple process, which guaranteed to edit your FLV in Sony Movie Studio 13 smoothly.

"When I bring the OBS FLV video into Sony Movie Studio 13, they play choppy and really slow, let alone for editing. I’m seeking for the solution to the FLV to Sony Movie Studio importing & editing issues. Any suggestions ? "

Although Sony Movie Studio supports the importing of a wide variety of file formats, FLV is not in the supported list. That’s why you found it a painful experience while importing FLV videos to Sony Movie Studio for further editing. To make FLV files compatible with Sony Movie Studio, the easy workaround is convert FLV to MPEG-2, which ensure the best results when working with Sony Movie Studio.


First of all, download Brorsoft Video Converter- the program works as the best FLV Video Converter. It helps you fast transcode FLV (obs flv , youtube flv files) to Movie Studio 13 preferred formats e.g. MPEG-2, WMV for easier editing. Plus, it supports converting all FLV files to Sony Movie Studio with fast encoding speed and without quality loss. What’s more, it’s the optimal tool for transcoding GoPro, Sony, Canon, Nikon, Panasonic, etc camera or camcorder videos to kinds of NLE programs Windows Movie Maker, Avid MC, Adobe Premier Pro, Sony Vegas Pro, Pinnacle Studio and more. Just download it and follow the simple guide to achieve your goal.


More Reading...
Change MKV to high quality AVI or other
Change TiVo to MP4 format without losing quality
Losslessly Backup and Rip Blu-ray to MKV Format
Change Tivo to MPEG (MPEG-1/MPEG-2/MPEG-4) Guide
Convert Panasonic MTS M2TS Files to Davinci Resolve Format
Convert and Import FLV to iTunes on Mac (El Capitan & Yosemite Included)

How to convert FLV clips to edit in Sony Movie Studio smoothly

Step 1. Add FLV videos to the program

Here you can directly drag & drop the FLV files to the converter, or click "Add Files" button to load the source FLV videos.

Tip: This FLV converter supports batch conversion, so you are allowed to add multiple files to convert at a time. Meanwhile, if you wanna combine multiple FLV clips into a single file, you can check the "Merge into one file" box.


Step 2. Select the output format

Click on the dropdown menu of "Format", and then follow Adobe Premiere/Sony Vegas" and select "MPEG-2(*.mpg)" as the output format. You can click "Settings" button to adjust output parameters, including the Bitrate of Video and Audio, the Codec of Video and Audio, Video Size, Sample Rate, Frame Rate, Audio Channels, etc.


Step 3. Begin the FLV to Sony Movie Studio conversion

Now click the "Convert" button, and then leave the FLV to Sony Movie Studio Converter to do the rest automatically for you.

Once the conversion completes, you can click "Open" button to get the generated MPEG-2 files for Sony Movie Studio easily. Then, it would be easy to import and edit FLV files with Movie Studio 9/10/11/12/13.

More Topics:

FLV to iTunes
FLV to iMovie
FLV to Final Cut Pro
Add and edit MOV in Windows Movie Maker
Join Several AVI Video Files into a Single File
Download Best alternative to MakeMKV for Mac
Fastest Blu-ray Copy Software on Mac(El Capitan)
Convert FLV clips to edit in Premiere Pro CC, CS6, CS5
Convert FLV to Pinnacle Studio supported video formats
Convert Sony CX455 XAVC S to iMovie friendly video types
Convert MXF to Pinnacle Studio 14/15/16/17 friendly formats
Convert your FLV videos to Windows Movie Maker for editing

Monday, May 9, 2016

Convert/Change Tivo to MPEG (MPEG-1/MPEG-2/MPEG-4) Step by Step Guide

Most guys wanan a simple way to change TiVo files to MPEG video for easy playback or burning. And in this article, I will outline a method to help those guys including you achieve the goal.

As a digital video recorder, TiVo can record TV videos based on people's interest and allow people to watch the recorded videos anytime they want, especially the release of "Season Pass" and "WishList" features which facilitate TiVo more widely used in people's daily life.TiVo stores the recorded TV videos on its hard drive, but its hard drive has a capacity limit, that is, you can only store limited TV videos within its hard drive capacity. When the hard drive is full, TiVo will automatically delete the stored TV videos by the storing time (oldest to newest).And TiVo is not a widely supported format by our media devices and it’s not a standard format for you burning DVD.

So if you want towatch TiVo recorded videos on your computer or mobile devices or video editing programs, you need to do the conversion beforehand, such as TiVo to MPEG (MPEG-1/MPEG-2/MPEG-4).


Here Brorsoft TiVo Video Converter is the optimal solution for you. It enables you batch convert TiVo files to MPEG-1, MPEG-2, MPEG-4 video without quality loss. In fact, this TiVo Converter is an all-in-one video convert app.

It can also help you quickly convert TiVo to MKV, AVI, WMV, MOV, MP4, etc popular format. You could get wonderful output files and never worry about out of audio/video sync.

Note: If you are running on Mac, please turn to its equivalent Mac version TiVo Converter Mac.

And the full tutorial would be divided into two parts: Part 1. Transfer TV shows from TiVo to PC; Part 2. Converting TiVo to MPEG. Learn the details.

Part 1. Transfer TV shows from TiVo to PC

Launch TiVo Desktop software on your PC. Connect TiVo to your home network, and then the TiVo Desktop will provide you with a list of shows for transferring to your PC. Then please transfer the TiVo TV shows you want to PC. Once all the shows you selected have been downloaded from your TiVo, they will appear in the Now Playing list in TiVo Desktop.

(Note: Click here for OS X 10.5)

More Reading...

Losslessly Backup and Rip Blu-ray to MKV Format
Transcode Canon EOS Rebel T6i MP4 files to iMovie
Import Sony NX30 MTS videos to Final Cut Pro 7, FCP X
Import Sony 4k XAVC (S) footage into Premiere Pro CC/CS6/CS5/CS4

Part 2. Converting TiVo to MPEG

Step 1: Start up this program, and then click “Add” to import all .tivo files.

Tip: When first loading, Brorsoft TiVo Converter will ask you to input your Media Access Key. Simply enter your Media Access Key, and click "OK" to confirm.


Step 2: Choose the MPEG as output format. Click Format bar and MPEG-1, MPEG-2, MPEG-4 are provided for you in Common Video profile list. To adjust video and audio parameters like codec, aspect ratio, bit rate, frame rate, sample rate, you could click on "Settings" button.


Tip: If you want to convert TiVo to mpeg-4 (*.mp4) for your Galaxy Note, Asus Infinity, Nook Tablet, etc with best settings, please choose the specific profiles the software has preset as output format and get the suitable settings.

Step 3: Start converting TiVo to MPEG format

Click Convert button to start TiVo to MPG conversion. The conversion process will take a while, and you’ll see an encoding progress bar.

Once finished, click the Open button in the main interface and you can locate the encoded TiVo files effortlessly. And then you are able to use these files as you want for your portable devices, PC, media player or video editing programs.

More Guides:

Convert TiVo to iPad
Convert TiVo to iMovie
Convert TiVo to Premiere
Convert Sony Action Cam videos to iMovie
Convert Tivo recordings to Android video format
Play Tivo Shows on Plex Media Server smoothly
Edit GoPro Hero 4 4K MP4 in Avid Media Composer
Convert MTS/MXF files for After Effects CS4/CS5/CS6
Transfer Sony FS700 4K/2K MTS files into FCP 7, FCP X
How to convert Canon .MOV to FCP friendly ProRes codec
Converting M2TS to Apple ProRes 422 MOV for Final Cut Pro
Solving Problems with GoPro (4K) video and Premiere Elements
Edit DJI Phantom 4/3/2 4k MOV/MP4 files in Windows Movie Maker

Wednesday, May 4, 2016

Blu-ray to MKV Losslessly - Rip/Backup Blu-ray to MKV Files without quality loss

Want to losslessly rip and backup Blu-ray to MKV video files? Follow the simple tutorial to achieve your goal smoothly.


The MKV format (Matroska video) is an open free Container format. It is intended to serve as a universal format for storing common multimedia content, like movies or TV shows. MKV files can play with almost every Media Player in Windows based on DirectShow (TM) if you have the proper codec (CCCP) installed. Sometimes you may want to rip Blu-ray to MKV so that you can watching the DVD movies on some portable devices or sharing the movies with family and friends more easily.

To copy Blu-ray to MKV with lossless video quality, you need a professional Blu-ray Ripping tool that can fast convert Blu-ray movies to MKV video files. The best program I can recommend for Blu-ray to MKV backup is Brorsoft Blu-ray Ripper (Refer to Top 5 Best Blu-ray Ripping Programs Review). With it, you can quickly rip Blu-ray/DVD movies to MKV and all other popular video formats like MP4, MOV, FLV, WMV, MPG, etc. It also provides hundreds of preset outputs for you to directly convert and play BD/DVD on iPad, iPhone, iPod, Apple TV, Samsung Galaxy Tab, Kindle Fire HD, etc. Below is a simple tutorial on how to backup Blu-ray to MKV with original 1080p Full HD quality.

NOTE: If you're using a Mac, please turn to Brorsoft Blu-ray Ripper for Mac, which can help finish Blu-ray to MKV conversion under Mac OS X (Mavericks included).

More Reading...

How to Convert Video_TS Folder to MP4
What if We erase iPhone contacts accidentally
Transcode Canon EOS Rebel T6i MP4 files to iMovie
Guide of Ripping DVDs for Viewing on Google Cardboard
How to rip Blu-ray to MKV for Full HD Backup Keeping 1080p

1. Load Blu-ray movies

Once install and run the software, click disc button to load Blu-ray, DVD content for converting. For ISO files, etc, you can also directly drag them to this program.


Tip: Freely select the subtitles for you Blu-ray movies from the "Subtitles" option. Thus, you can backup and transfer Blu-ray movie to HDTV or other home theater for playback with wanted subttiles.

2. Select MKV as the output format and set the output folder.

Click on the dropdown menu of "Format" and choose the Common video> MKV(Matroska)Video(*.mkv). You can also choose the "MKV HD Video(*.mkv)" from the HD Video sublist. Now, you can set the output folder.


Import Note: Click the "Settings" icon, and you can adjust codec, bit rate, frame rate, sample rate and audio channel in the interface according to your needs and optimize the output file quality. To keep the 1080p video resolution, you'd set the video size as 1920*1080 to convert Blu-ray to MKV for HD backup keeping 1080p.

Start ripping Blu-ray to MKV

After all settings is OK, go back to the main interface to tap the "Convert" button to start ripping Blu-ray files to MKV videos. When the conversion is over, you can click "Open" to locate the ripped files and easily transfer them to your media player without any limit.

More Topics:

Rip Disney Blu-ray Discs
Rip Blu-ray on Mavericks
Backup Blu-ray Losslessly
Remove Blu-ray Region Codes
Undelete files from iCloud backup
Convert BDMV folder for editing in iMovie
Play Tivo Shows on Plex Media Server smoothly
Convert Tivo recordings to Android video format
Compress 4K/1080P ProRes to DaVinci Resolve 12/11
How to convert MOV to WMV for Windows Movie Maker
Rip DVD videos to PowerPoint Making DVD Presentation
Convert Blu-ray Disk Movie to MP4/MOV on Mac lossless
Convert Apple ProRes media to DNxHD For Avid MC on Mac
Import 4K/1080P Prores MOV file to Premiere Pro CC/CS6/CS5

Thursday, April 28, 2016

Edit Canon EOS Rebel T6i MP4 files in iMovie 11/10/09/08

The easy option to get iMovie accept Canon EOS Rebel T6i MP4 files is to rewrap and convert MP4 to AIC encoded MOV. This will help you import the file correctly and saving the rendering time. Now reading the pages below to learn how to make it true. Enjoy!

A bit frustrating. The MP4 files from Canon EOS Rebel T6i are not well supported by iMovie, as you may encounter many audio and video problems.

"“I just purchase a Canon EOS Rebel T6i camcorder, and shoot some mp4 video clips, when I try to import the mp4 videos to iMovie for editing, problem comes, iMovie cannot recognized the files, so how can I solve this problem, or rather, how can I effortless import Canon T6i MP4 to iMovie on my Mac OS X? Thanks.”

Some people including you may be confused: iMovie says it supports MP4, but why I can't import EOS Rebel T6i MP4 to iMovie? Well, that's because iMovie prefers MPEG-4 and H.264 codecs instead of others while MP4 can contain various video codecs. So if your MP4 files are not accepted by iMovie, it's probably because of the video codec incompatibility.


To smoothly import and edit Canon T6i MP4 files in iMovie 11/10/09/08, the easy workaround is to convert MP4 to AIC MOV which is the best codecs with best results when working with iMovie. The best tool to help you get it done is Brorsoft Video Converter for Mac.

This converter can be used to convert any MP4 video to iMoviecompatible format ( AIC MOV) with fast conversion speed and high output quality. After the file conversion, you can edit the video as you like through iMovie. Meanwhile, this video convert tool can create files compatible with various non-linear editing systems like Final Cut Pro, iMovie, and Adobe Premiere Pro, Avid Media Composer, etc. If you are facing problems when editing Canon T6i MP4 video in iMovie on Windows, please turn to Brorsoft Video Converter. Download the software and this article will guide you through how to rewrap and transcode Canon Rebel T6i MP4 to AIC MOV for iMovie.

(Note: Click here for OS X 10.5)

More Reading...

How to Convert Video_TS Folder to MP4
Guide: Convert TiVo recordings to Plex friendly video
How to import Nikon D5500 MOV files into EDIUS 5/6/7
How to rip Blu-ray to H.264 MP4/MKV/M4V/MOV with ease
How to Convert Canon G5X/G9X MP4 and Import MP4 to Final Cut Pro X/7/6

How to convert Canon EOS Rebel T6i MP4 to iMovie supported video

1. Import MP4 files

Click File > Add Video/Audio to add the MP4 movies from Canon EOS Rebel T6i you want to convert for iMovie. Or simply drag your videos to the left item bar for converting. Batch conversion is supported so you can add many files at a time to save the conversion time.


2. Choose iMovie compatible format

Click "Format" bar to choose the output format. Click and choose iMovie and Final Cut Express -> Apple InterMediate Codec (AIC) (*.mov). It’s the best format for editing Canon T6i video in iMovie 8/9/11.


Tip: Click Settings icon you can adjust video codec, bit rate, frame rate, sample rate, and audio channels, etc. To bear least quality loss, you may set A/V parameters according to the source MP4 file.

3. Start conversion

When all the settings are done, click Convert to start the conversion. Wait for the conversion to be done, you can import the converted video to iMovie 11 as well as iMovie 8/9/10 for editing without any trouble.

More Topics:

MP4 to Sony Vegas
MP4 to After Effects
MP4 to Avid Media Composer
MP4 to Windows Movie Maker
Tips for editing VOB files using Premiere Pro CC
Convert DVD to Samsung TV supported file formats
How to Bring Avid DNxHD MXF files into After Effects
Watch DVD VOB files on Surface Windows 8 RT Tablet
Edit XC10 MXF with Premiere Elements without problems
Editing Blackmagic 4K footage in Premiere Pro CC/CS6/CS5
Recover iPhone Text messages from iCloud backup selectively
How to batch convert AVI/MKV/VOB/MOV to Galaxy Tab S2
Tips fixing Canon C300 MK II Corrupt MXF files on Mac OS X
How can I "Import" Canon HF G20 .MTS (AVCHD) files to iMovie

Thursday, March 17, 2016

XAVC (S) Transfer Mac - Importing Sony 4k XAVC (S) footage into Premiere Pro CC/CS6/CS5/CS4

This article outlines how to import 4K XAVC (S) footage into Adobe Premiere Pro CS6/CS5/CS4 or CC7 for smooth editing. Keep reading for a brief how-to.

If you are fond of shooting videos, you may have used cameras or camcorders. If you want to record high 4K quality videos, Sony 4K XAVC (S)camcorder will be a good choice. But there is still a common problem among the Sony users when they want to import and edit Sony XAVC (S) medias in Adobe Premiere Pro (Even the latest Adobe PPro cc7): Premiere cannot recognize Sony 4K XAVC (S) files.

Source From : 4K XAVC/XAVC S to Premiere Pro CS4/CS5/CS6/CC Workflow

Q1: Has anyone worked with media from the Sony a7S camera? I’m looking for some tips regarding post workflow and getting the Sony a7S XAVC S media into Premiere Pro CS6. There are a few issues when it comes to view, load and edit Sony a7S XAVC S in Premiere Pro.

Q2: I’m working on a feature film using the Sony PXW-X70 and we are shooting XAVC videos with it. Is there an easy way that allows easy import XAVC files into Adobe Premiere Pro directly, without having to use or open Sony’s lousy Content Browser or other complex plug-ins. I’m seeking the Sony PXW-X70 XAVC to Premiere Pro best workflow.


Adobe can’t support XAVC or XAVC S 4K & HD.To edit XAVC/XAVC S footage in Premiere Pro CC, CS6, CS5, CS4 smoothly, a suggestion is to use Brorsoft Video Converter for Mac to transcode 4K XAVC/XAVC S to MPEG-2, which is a friendly format supported by Adobe Premiere Pro program.

Overall, it is an easy-to-use yet professional XAVC/XAVC S Converter for Mac. With it, you can effortlessly transcode Sony’s new XAVC/XAVC S codec to Mac full compatible format and keep original quality at mean while. This software can export MPEG-2 for Adobe Premiere Pro, ProRes for Final Cut Pro, Apple InterMedaite Codec(AIC) for iMovie, FCE, DNxHD for Avid Media Composer and more NLE systems for native editing. For Windows users, please get Video Converter. Here is an easy and efficient solution for you.

(Note: Click here for OS X 10.5)

4K XAVC/XAVC S to Premiere Pro CS4/CS5/CS6/CC Workflow

1. Add raw files > Run the program you just set up. Drag and drop the XAVC or XAVC S files to the Converter. You can also hit Add files button to import videos to the app. If you wanna combine Sony XAVC files into one file, you can click the “Merge into one” box.


2. Choose output format > Click “Format” bar and choose Adobe Premiere/Sony Vegas –> MPEG-2(*.mpg) as output format for editing XAVC in Adobe with natively supported video codec.


3. Advanced V/A settings > Click “Settings” button if you’d like to customize advanced audio and video parameters like Video Codec, aspect ratio, bit rate, frame rate, Audio codec, sample rate, audio channels.


4. Start converting XAVC files > Hit the convert button of the best Sony XAVC Converter, it will start converting XAVC/XAVC S for importing to Adobe Premiere Pro immediately. Soon after the conversion, just click “Open” button to get the generated files for natively editing in Premiere Pro CC7/CS6/CS5/CS4/CS3 perfectly.

Additional Tips:

This powerful XAVC to Adobe Premiere Converter not only can help you convert XAVC/XAVC S to Premiere, but also enables anyone with XAVC or XAVC S files to use in any non-linear editor like After Effects, Final Cut Pro, iMovie, FCE, Avid Media Composer, etc as long as transcode XAVC S to a recognizable format.

More Topics:

XAVC S to Sony Vegas Pro
XAVC S to ProRes Converter
XAVC S to Windows Movie Maker
Import DJI Phantom 4 4K files to Final Cut Pro 7
Edit Sony F5/F55 XAVC clips on Davinci Resolve
Tricks for Downscaling DJI Phantom 4 4k to 1080p
Convert MKV for Editing in Sony Vegas Pro smoothly
DJI Phantom 4K to Adobe Premiere Pro best workflow
DJI Phantom 4 4K files to Pinnacle Studio best workflow
Convert and Import MP4 videos into Sony Vegas Pro 13
Get Sony PMW-400 footage to work with Pinnacle Studio 15/16/17/18
Converting DJI Phantom 4K MP4/MOV footage for Premiere Elements

Wednesday, March 2, 2016

How to Watch DVD videos on Google Cardboard with 3D effect

Summary: The article will show you the simple guide on how to watch DVD films on your iOS/Android handsets with Google Cardboard.

Google Cardboard is a fun, inexpensive way to turn nearly any Android phone or iPhone into a virtual reality viewer, allowing nearly anyone to get in on the fun. It'll be a great pity that you haven't played DVD movies on your Andorid/iOS devices through Google Cardboard with 3D effects, if you own lots of DVD collections at hand. In this article, we will talk about how to watch DVD films on Google Cardboard freely.


To watch your own videos on Cardboard with 3D effect, you can download a free app called Cardboard theater, which allows you to enjoy your own 2D and 3D movies in a virtual cinema. Just upload your movies on the phone or open them directly from a browser or a 3rd party application and load the videos with this app and then enjoy. But to watch any incompatible file formats such as 2D/3D DVD, Blu-ray, FLV, MXF, MTS, Tivo, etc video files on Google Cardboard in 3D effect, you will need to convert these file formats to Google Cardboard supported 3D SBS/Top and Bottom/Red-Cyan formats at first.

For the purpose of finishing all targets, you're highly recommended to adopt Brorsoft DVD Ripper, a comprehensive tool that's capable of converting various media files to Google Cardboard compatible SBS 3D videos with fast speed and excellent output quality. If you are a Mac user, you can turn to Brorsoft DVD Ripper for Mac. Just download the right program and follow the guide below to learn how to enjoy DVD films on Google Cardboard.

Guide of Ripping DVDs for Viewing on Google Cardboard

Step 1. Import DVD source files

Insert the DVD disc into your computer's DVD drive and click the "Load DVD" button on the top left to select and load the DVD movies you want to play on your Galaxy phones or tablets. ISO and IFO files are also supported. After the movies are loaded, you can preview them on the right viewing window and adjust volume or take snapshots freely.


Step 2. Choose output video format

If you are looking for 3D effect, you are advised to click "Format" and move to "3D Video" category. There are a lot of format options for you, here "MP4 Side-by-Side 3D Video (*.mp4)" is recommended. Or just move to "Common Video" and click "H.264 Video(*.mp4)" for plain 2D playback.


Step 3. Start ripping DVD to Google Cardboard

Hit the "Convert" button under "Preview" window to carry out the conversion process. Once the conversion is finished, you can click "Open" button to get the output files. Now you can stream converted video to Android devices or your iPhone and play with Google Cardboard.

More Topics:

Play DVD on Nokia N1
Play DVD on LG G Pad
Play DVD on Galaxy Note 5
Play DVD on Galaxy Tab S2
Play DVD on Google Pixel C
Entirely restore your iPhone from backup
What if We erase iPhone contacts accidentally
All-in-one iPhone Backup Entirely or Selectively
Rip 3D Blu-ray for Viewing on Google Cardboard
Factory Reset Your iPhones without using Apple ID
Simple Steps to Rip Blu-ray to MKV Losslessly on Mac